Providing an accessible unit is only half the job. Where you put it decides whether it actually works for the people who need it. A unit parked at the bottom of a muddy slope, or tucked behind a row of vendor tents, might as well not be there for a guest using a wheelchair or a walker. They notice. And so does everyone watching them struggle to reach it.
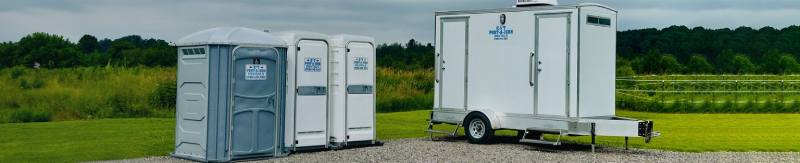
Renting a handicap porta potty is the straightforward part. Plenty of local providers, like K & T Port-A-John Rentals, can deliver one to your site. The harder question, and the one that gets skipped, is exactly where it goes once it arrives. Placement is what separates a unit that meets accessibility needs from one that only looks the part on the rental invoice.
Good placement comes down to a few things. The ground it sits on, how close it is to the action, whether the path to it stays clear, and how it connects to parking and entrances. Get those right and most accessibility problems disappear before the event even starts.
Place units on a stable, level, and accessible surface
Start with the ground. It matters more than almost anything else.
An accessible unit needs firm, level footing. Wheelchair casters and walker legs sink into soft grass and gravel, and a slope that feels minor on foot becomes a real barrier on wheels. If the surface shifts or tilts, transferring in and out of the unit gets unsafe fast.
Look for ground that is firm and slip-resistant. Packed gravel, asphalt, concrete, or a level patch of compacted earth all work. Avoid:
- Steep slopes or any noticeable incline.
- Soft, uneven grass that gives way under weight.
- Low spots where water pools and turns to mud after rain.
- Loose gravel that shifts under a wheel.
If the only available spot is grass, a portable platform or ground mat under and around the unit makes a big difference. It gives a stable surface to roll onto and a flat base for the unit itself. Worth asking your provider about, since not every planner thinks of it until the wheels are already stuck.
One more thing people forget. The area right outside the door needs to be level too, not just the pad under the unit. A guest has to approach, open the door, and turn to enter, and all of that needs solid ground. A unit sitting perfectly level on its pad does no good if the approach to it is a muddy rut.
Position restrooms near main activity areas without creating obstacles
Distance is the next thing to get right. An accessible unit placed far from where people gather defeats its own purpose.
Think about the route a guest with mobility challenges has to travel. Another guest might shrug off a long walk to the restrooms. For someone using a wheelchair or moving slowly, that same stretch across a field is tiring, sometimes painful, and occasionally enough that they skip the activities rather than make the trip twice.
Keep accessible units within easy reach of the main areas. Near the seating, the food, the stage, wherever people spend their time. But not so close that they sit in a high-traffic choke point where crowds block the path.
There is a balance here that takes a little thought:
- Close enough that reaching the unit is not a project.
- Far enough to give privacy and avoid the crush of foot traffic.
- Positioned so the path stays clear even when the crowd swells.
A quiet corner that is still easy to roll to often beats a central spot that gets mobbed. You want the unit findable and reachable, not buried and not stuck in the middle of the rush.
Ensure clear ADA-compliant access routes
A well-placed unit is useless if the path to it is blocked. The route matters as much as the destination.
Accessible design guidance generally calls for a clear path of at least 36 inches wide, enough for a wheelchair to pass without scraping. For turns and the space in front of the door, more room helps, closer to 60 inches so a chair can turn around. Treat these as general guidance rather than fixed law, since requirements vary by region and event type.
Whatever the width, the path has to stay clear. That means walking the route yourself and looking for the things that trip people up:
- Curbs and steps with no ramp.
- Extension cords and hoses running across the path.
- Tent stakes, sign bases, and equipment crowding the route.
- Gravel or grass edges that catch a wheel.
Cords are the sneaky one. They appear after setup, once vendors and crews plug things in, and a cord taped across an accessible path is a tripping and rolling hazard nobody planned for. Run them around the edge, or cover them with proper cable ramps.
The path also needs to stay open for the whole event, not just at the start. Crowds drift, vendors expand their footprint, someone parks a cart in the wrong spot. Assign somebody to check the accessible routes during the event, because a path that was clear at 10 a.m. is often cluttered by mid-afternoon.
Consider parking, drop-off zones, and other accessibility features
Accessibility does not start at the restroom. It starts in the parking lot.
If your event has accessible parking, the accessible units should sit reasonably near it, or near the drop-off zone where someone might be let out of a vehicle. A guest who parks in an accessible spot and then faces a long, rough trek to the nearest accessible washroom is being set up to struggle.
Tie the placement into the rest of your accessibility setup:
- Near accessible parking and passenger drop-off points.
- Along the same routes as ramps and accessible entrances.
- Within reach of accessible seating areas.
The goal is a connected experience. Parking, entrance, seating, restroom, all linked by paths a wheelchair can follow without a detour or a dead end. When these pieces are scattered around a site with no thought to how they connect, each one might be fine on its own while the whole thing fails the person trying to use it.
Common placement mistakes that reduce accessibility
Most accessibility failures are not deliberate. They come from a handful of oversights that are easy to make and easy to prevent.
Blocking the unit. Fencing, barricades, vendor booths, and equipment have a way of creeping in around restrooms. A unit that was reachable on the site plan ends up walled off by the time the gates open.
Placing it too far. Putting accessible units off in a corner while standard units sit close to the action sends a clear message to the guests who need them. It also makes the trip hard enough that some will avoid it.
Ignoring changing conditions. Ground that was firm on a dry morning turns to mud after rain. Paths that were thin at opening clog up by afternoon. Placement that ignores how a site shifts through the day tends to fail right when it matters most.
Forgetting signage. An accessible unit nobody can find is barely better than no unit at all. Clear, visible signs pointing the way, at a height people can read, make the difference between a guest reaching it easily and a guest giving up.
Plan accessibility before the trucks arrive
Good placement is not complicated, but it does take thinking ahead. Firm and level ground, a spot close to the action, a clear path that stays clear, and a sensible link to parking and entrances. Those four things cover most of what makes an accessible unit actually accessible.
The mistake is treating placement as an afterthought, something to sort out when the delivery truck shows up. By then the good spots are taken and the easy fixes are gone.
Walk your site early, picture the route a guest with mobility challenges would take, and plan from there. If you are unsure, ask your portable restroom provider where the accessible units should go. They set these up at events all the time and can spot problems you might miss.
Questions people ask about accessible placement
How close should a handicap porta potty be to event activities?
Close enough that reaching it is not a hardship. There is no single magic number, but keeping accessible units within easy rolling distance of seating, food, and the main areas is the goal. If a guest using a wheelchair would find the trip tiring or have to cross rough ground, the unit is too far.
Can ADA porta potties be placed on grass or gravel?
They can, but only with care. Soft grass and loose gravel make rolling and transferring difficult and can be unsafe. A portable platform or ground mat under and around the unit creates a firm, level surface and solves most of the problem. Packed gravel or a solid pad is better when you can manage it.
Do handicap-accessible units require a special access path?
They need a clear, wide, level path free of curbs, steps, cords, and clutter. General guidance points to a path around 36 inches wide, with more room near the door for turning. The path also has to stay clear for the whole event, not just at setup.
How many handicap porta potties are needed for an event?
A common guideline is at least one accessible unit for every 20 standard units, and a minimum of one for any public event. Larger crowds and events spread over a wide area may need more, so accessible units are not all clustered in one corner. Check with your provider for your specific setup.
What are the most common ADA porta potty placement mistakes?
Blocking units with fencing or equipment, placing them too far from the action, ignoring ground that turns muddy or paths that get crowded, and skipping clear signage. Each one quietly undercuts accessibility, and all of them are easy to avoid with a little planning.